First web scraper
A step-by-step guide to writing a web scraper with Python.
The course assumes the reader has little experience with Python and the command line, covering a number of fundamental skills that can be applied to other problems.
This guide was initially developed by Chase Davis, Jackie Kazil, Sisi Wei and Matt Wynn for bootcamps held by Investigative Reporters and Editors at the University of Missouri in Columbia, Missouri in 2013 and 2014.
It was modified by Ben Welsh in December 2014 for workshops at The Centre for Cultura Contemporania de Barcelona, Medialab-Prado and the Escuela de Periodismo y Comunicación at Universidad Rey Juan Carlos and further modified by Derek Willis in January 2022 for a class at the Philip Merrill College of Journalism at the University of Maryland.
Code repository: https://github.com/NewsAppsUMD/first-web-scraper-umd
Documentation: first-web-scraper.rtfd.org/
Issues: https://github.com/NewsAppsUMD/first-web-scraper-umd/issues/
What you will make
This tutorial will guide you through the process of writing a Python script that can extract the list of sanctioned physicians from a state government website and save it as comma-delimited text ready for analysis.
Prelude: Prerequisites
Before you can begin, your computer needs the following tools installed and working to participate.
A GitHub account.
A browser. That’s it!
For this tutorial, we’ll be using Python. Python is a computer programming language, like many others you may have heard of such as Ruby or PHP or Java. It is free and open source.
You should see something like this after you hit enter:
$ python -V
Python 3.12.1
Act 1: Hello Codespaces
Start at the GitHub URL for this repository
Click the green “Use this template” button and choose “Open in a codespace”. You should see something like this:
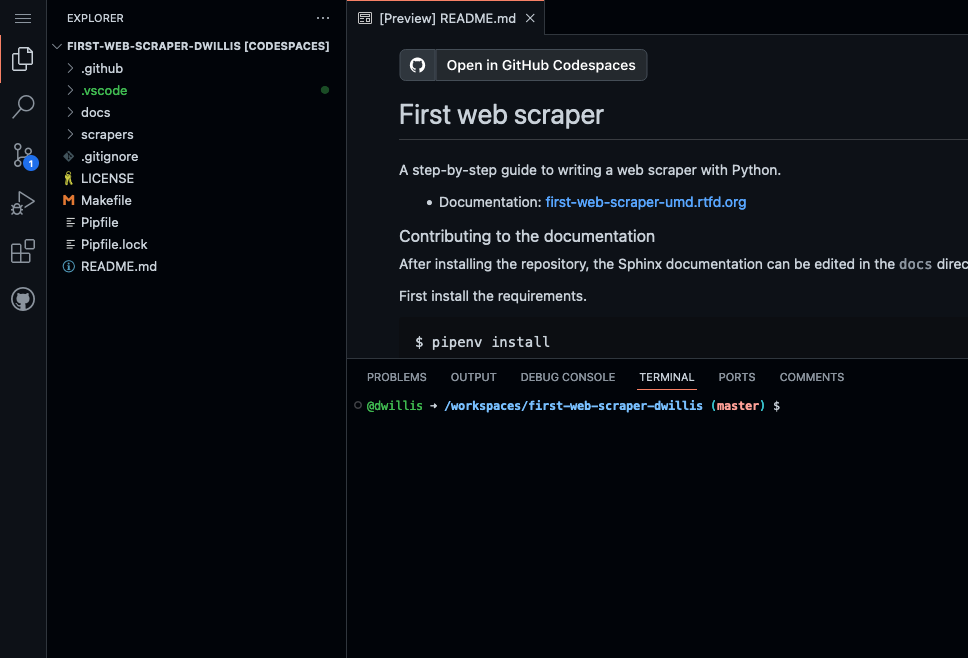
The browser is divided into three sections: on the left is a file explorer, listing all of the files in this repository. The top right shows whatever file you’re currently viewing or editing, defaulting to README.md. The bottom right shows the terminal, where we’ll run commands.
The codespace will be connected to your repository in the the NewsApps organization on GitHub.
Open up the README by clicking on README.md on the left side and type something in it. Maybe change the heading like:
# My First Web Scraper
Make sure to save it. You’ll see on the left that there’s a yellow “M” next to README.md, meaning you’ve made some edits. Let’s double-check that in the terminal:
$ git status
You should see something like this:

If so, we can add and commit it:
$ git add README.md
Log its creation with Git’s commit command. You can include a personalized message after the -m flag.
$ git commit -m "First commit"
Now, finally, push your commit up to GitHub.
$ git push origin main
Reload your repository on GitHub and see your handiwork.
Act 2: The command line
Working with Python (and pretty much any other programming language) means becoming comfortable with the command line environment.
In this lesson we’ll be using it to give the computer direct commands to manage files, navigate through directories and execute Python scripts. Don’t worry, it’ll only require only a few basic commands we’ll cover now.
Print the current directory
The first thing we want to do if find out where you are. Type this:
$ pwd
Note
You don’t have to type the “$”. It’s a generic symbol geeks use to show they’re working on the command line.
The terminal should print out your current location relative to the root of your computer’s filesystem. In this case, you’re probably in the default directory codespaces, which is “/workspaces/{name of your repository}”
It’s easy to lose track of which folder you’re in when you’re working from the command line, so this is a helpful tool for finding your way. You’ll end up using it a lot more than you might think.
Note
In case you’re curious, pwd standards “present working directory” and cd
stands for “change directory,” a tool we’ll use again soon to move between
folders on your file system.
List files in a directory
In order to see all the files and folders in a directory, there’s another command you need to learn. Go ahead and type:
$ ls
You should now see a list of files and folders appear from the current directory.
Change directories
Now let’s move. In order to change directories from the command line, we’ll
return to the cd command we saw earlier, which works for OSX, Linux and Windows.
The only thing you need to do is tell it which directory to move into. In this case, the following will get you into the docs directory:
$ cd docs
Now run ls or dir to see what files we can find there. They should
mirror what you see as you look at your desktop in your operating system’s
user interface.
To move back to our home folder, we’ll use the cd
command again, but with a little twist.
$ cd ..
You’ll notice that will move you back to the home directory where we began.
When you’re working from the command line, it helps to think of your directory structure as a tree. Navigating through the directories is like going higher and lower on various branches. The convention for moving backwards is ..
Creating directories and files
You might also find it useful sometimes to create files and directories
from the command line. Let’s create a folder called scrapers under our
home directory that we can use to store code from this tutorial.
Here’s how:
$ mkdir scrapers
Next let’s jump into the directory. If you remember, that goes like this:
$ cd scrapers
If you type ls or dir you’ll notice that nothing is there. That’s because all we’ve done so far is create a directory, but we haven’t put any files in it yet.
You won’t have to do this very often, but the command for creating a blank file in OSX and Linux is called touch. So here’s how you make a new file named test.py.
$ touch test.py
There’s no similar command in Windows, but you can accomplish the same thing by saving a file from a text editor or other program into our new directory.
Deleting directories and files
If you wanted to remove the file you just made, here’s how:
$ rm test.py
Warning
This must be done with caution. Files you delete from the command line do not go into the recycle bin. They are gone. Forever.
And that’s it! You’ve learned all the basic command-line tricks necessary to move on.
Act 2: Python
Python can be used for almost any application you can imagine, from building websites to running robots.
A thorough overview of the language would take months, so our class is going to concentrate on the absolute basics – basic principles that you need to understand as you complete this course.
A Python file is nothing more than a text file that has the extension “.py” at the end of its name. Any time you see a “.py” file, you can run it from the command line by typing into the command line:
$ python filename.py
That’s it. And it works pretty much everywhere.
Python also comes with a very neat feature called an interactive interpreter, which allows you to execute Python code one line at a time, sort of like working from the command line.
We’ll be using this a lot in the beginning to demonstrate concepts, but in the real world it’s often useful for testing and debugging.
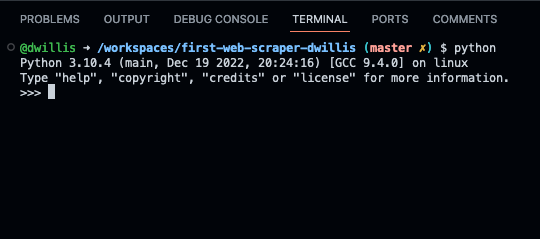
To open the interpreter, simply type python from your command line, like this.
$ python
And here’s what you should get.
Next we’ll use the interpreter to walk through a handful of basic concepts you need to understand if you’re going to be writing code, Python or otherwise.
Variables are like containers that hold different types of data so you can go back and refer to them later. They’re fundamental to programming in any language, and you’ll use them all the time.
To try them out, let’s go to your Python interpreter and start writing Python!
>>> greeting = "Hello, world!"
In this case, we’ve created a variable called greeting and
assigned it the string value “Hello, world!”.
In Python, variable assignment is done with the = sign. On the left is the name of the variable you want to create (it can be anything) and on the right is the value that you want to assign to that variable.
If we use the print command on the variable, Python will output “Hello, world!” to
the terminal because that value is stored in the variable.
>>> print(greeting)
Hello world!
Variables can contain many different kinds of data types. There are integers, strings, floating point numbers (decimals), and other types of data that languages like SQL like to deal with in different ways.
Python is no different. In particular, there are six different data types you will be dealing with on a regular basis: strings, integers, floats, lists, tuples and dictionaries. Here’s a little detail on each.
Strings contain text values like the “Hello, world!” example above. There’s not much to say about them other than that they are declared within single or double quotes like so:
>>> greeting = "Hello, world!"
>>> goodbye = "Seeya later, dude."
>>> favorite_animal = 'Donkey'
Integers are whole numbers like 1, 2, 1000 and 1000000. They do not have decimal points. Unlike many other variable types, integers are not declared with any special type of syntax. You can simply assign them to a variable straight away, like this:
>>> a = 1
>>> b = 2
>>> c = 1000
Floats are a fancy name for numbers with decimal points in them. They are declared the same way as integers but have some idiosyncracies you don’t need to worry about for now.
>>> a = 1.1
>>> b = 0.99332
>>> c = 100.123
Lists are collections of values or variables. They are
declared with brackets like these [], and items inside are separated by
commas. They can hold collections of any type of data, including other
lists. Here are several examples:
>>> list_of_numbers = [1, 2, 3, 4, 5]
>>> list_of_strings = ['a', 'b', 'c', 'd']
>>> list_of_both = [1, 'a', 2, 'b']
>>> list of lists = [[1, 2, 3], [4, 5, 6], ['a', 'b', 'c']]
Lists also have another neat feature: The ability to retrieve individual items. In order to get a specific item out of a list, you just pass in its position.
All lists in Python are zero-indexed, which means the first item in them sits at position 0.
>>> my_list = ['a', 'b', 'c', 'd']
>>> my_list[0]
'a'
>>> my_list[2]
'c'
You can also extract a range of values by specifiying the first and last positions you want to retrieve with a colon in between them, like this:
>>> my_list[0:2]
['a', 'b']
Tuples are a special type of list that cannot be changed once they are created. That’s not especially important right now. All you need to know is that they are declared with parentheses (). For now, just think of them as lists.
>>> tuple_of_numbers = (1, 2, 3, 4, 5)
>>> tuple_of_strings = ('a', 'b', 'c', 'd')
Dictionaries are probably the most difficult data type to explain, but also among the most useful. In technical terms, they are storehouses for pairs of keys and values. You can think of them like a phonebook.
An example will make this a little more clear.
>>> my_phonebook = {'Mom': '713-555-5555', 'Chinese Takeout': '573-555-5555'}
In this example, the keys are the names “Mom” and “Chinese takeout”, which are declared as strings (Python dictionary keys usually are).
The values are the phone numbers, which are also strings, although dictionary values in practice can be any data type.
If you wanted to get Mom’s phone number from the dictionary, here’s how:
>>> my_phonebook['Mom']
713-555-5555
There’s a lot more to dictionaries, but that’s all you need to know for now.
As a beginner your first Python scripts won’t be much more complicated that a series of commands that execute one after another, working together to accomplish a task.
In those situations, it is helpful to be able to control the order and conditions under which those commands will run.
That’s where control structures come in – simple logical operators that allow you to execute parts of your code when the right conditions call for it.
Here are two you will end up using a lot.
If statements are pretty much exactly what they sound like. If a certain condition is met, your program should do something.
Let’s start with a simple example.
>>> number = 10
>>> if number > 5:
>>>    print("Wow, that's a big number!")
>>>
Wow, that's a big number!
Our little program in this case starts with a variable, which we’ve called number, being set to 10. That’s pretty simple, and a concept you should be familiar with by this point.
>>> number = 10
>>> if number > 5:
>>>    print("Wow, that's a big number!")
The next line, if number > 5: declares our if statement. In this case, we want something to happen if the number variable is greater than 5.
>>> number = 10
>>> if number > 5:
>>>    print("Wow, that's a big number!")
Most of the if statements we build are going to rely on equality operators like the kind we learned in elementary school: greater than (>), less than (<), greater than or equal to (>=), less than or equal to (<=) and plain old “equals”. The equals operator is a little tricky, in that it is declared with two equals signs (==), not one (=). Why is that? Because you’ll remember from above that a single equals sign is the notation we use to assign a value to a variable!
Next, take note of the indentation. In Python, whitespace matters. A lot. Notice that I said indents must be four spaces. Four spaces means four spaces – not a tab.
>>> number = 10
>>> if number > 5:
>>>    print("Wow, that's a big number!")
Tabs and spaces are different. To avoid problems, you should press the space bar four times whenever you indent Python code.
Note
There are some text editors that will automatically convert tabs to spaces, and once you feel more comfortable you might want to use one. But for now, get in the habit of making all indents four spaces.
If you look closely, there’s another small detail you need to remember: The colon! When we declare an if statement, we always end that line with a colon.
>>> number = 10
>>> if number > 5:
>>>     print("Wow, that's a big number!")
>>>
>>> print("I execute no matter what your number is!")
It helps sometimes to think of your program as taking place on different levels.
In this case, the first level of our program (the one that isn’t indented) has us declaring the variable number = 10 and setting up our if condition, if number > 5:.
The second level of our program executes only on the condition that our if statement is true. Therefore, because it depends on that if statement, it is indented four spaces.
If we wanted to continue our program back on the first level, we could do something like this:
>>> number = 10
>>> if number > 5:
>>>     print("Wow, that's a big number!")
>>>
>>> print("I execute no matter what your number is!")
>>>
Wow, that's a big number!
I execute no matter what your number is!
The last statement doesn’t depend on the if statement, so it will always run.
Now let’s talk about a common companion for if statement – the else clause. It can be combined with an if statement to have the script execute a block of code when it turns out not to be true.
You don’t need to have an else condition for your if statements, but sometimes it helps. Consider this example:
number = 10
if number > 5:
    print("Wow, that's a big number!")
else:
    print("Gee, that number's kind of small, don't you think?")
In this case, we’re telling our program to print one thing if number is greater than five, and something else if it’s not. Notice that the else statement also ends with a colon, and as such its contents are also indented four spaces.
Remember earlier we discussed the concept of a list – the type of variable that can hold multiple items in it all at once?
Many times during your programming career, you’ll find it helps to run through an entire list of items and do something with all of them, one at a time.
That’s where for loops come in. Let’s start by having Python say the ABC’s:
>>> list_of_letters = ['a', 'b', 'c']
>>> for letter in list_of_letters:
>>>     print(letter)
>>>
a
b
c
The output of this statement is what you might guess. But there are still a few things to unpack here – some familiar and some not.
First, you’ll notice from looking at the print statement that our
indentation rules still apply. Everything that happens within the for
loop must still be indented four spaces from the main level of the
program. You’ll also see that the line declaring the loop ends in a
colon, just like the if and else statements.
Second, turn your attention to the syntax of declaring the loop itself.
>>> list_of_letters = ['a', 'b', 'c']
>>> for letter in list_of_letters:
>>>     print(letter)
All of our for loops start, unsurprisingly, with the word for and
follow the pattern for variable_name in list:. The variable_name
can be anything you want – it’s essentially just a new variable you’re
creating to refer to each item within your list as the for loop iterates
over it.
In this case we chose letter, but you could just as easily call it donkey, like so:
>>> list_of_letters = ['a', 'b', 'c']
>>> for donkey in list_of_letters:
>>>     print(donkey)
The next thing you have to specify is the list you want to loop over, in
this case list_of_letters. The line ends with a colon, and the next
line starts with an indent. And that’s the basics of building a loop!
Often it’s helpful to encapsulate a sequence of programming instructions into little tools that can be used over and over again. That’s where functions come in.
Think of functions like little boxes. They take input (known as arguments), perform some operations on those arguments, and then return an output.
In Python, a simple function might take an integer and divide it by two, like this:
>>> def divide_by_two(x):
>>>    return x / 2.0
In order to call that function later in the program, I would simply have to invoke its name and feed it an integer – any integer at all – like so:
>>> def divide_by_two(x):
>>>    return x / 2.0
>>> divide_by_two(10)
5
Once you write a function (assuming it works) you don’t need to know what’s inside. You can just feed it an input and expect an output in return.
Every function must be declared by the word def, which stands for “define”. That is followed by the name of the function. Like the variable in a loop you can call it anything you want.
>>> def get_half(x):
>>>    return x / 2.0
The name is then followed by a set of parentheses in which you can define the arguments the function should expect. In our example above, we’ve called the only argument``x``.
When we feed a value in, like the number 10, a variable by the name of our argument is created within the function. You can name that what you want too.
>>> def get_half(num):
>>>    return num / 2.0
After you finish declaring arguments, you’ll see something familiar –the colon. Just like the if statements and for loops, the next line must be indented four spaces because any code within the function is nested one level deeper than the base level of the program.
Most functions return some kind of output. Arguments go in, some processing happens, and something comes out. That’s what the return statement is for.
>>> def get_half(num):
>>>    return num / 2.0
Functions don’t necessarily need arguments, nor do they always need to return a value using the return command. You could also do something like this:
def say_hello():
    print("Hello!")
But the idea of arguments and return values are still fundamental in
understanding functions, and they will come up more often than not.
Lucky for us, Python already has tools filled with functions to do pretty much anything you’d ever want to do with a programming language: everything from navigating the web to scraping and analyzing data to performing mathematical operations to building websites.
Some of these are built into a toolbox that comes with the language, known as the standard library. Others have been built by members of the developer community and can be downloaded and installed from the web.
There are two ways to import these tools into your scripts.
To pull in an entire toolkit, use the import command. In this case,
we’ll get the urllib package, which allows us to visit websites
with Python:
>>> import urllib.request
>>> urllib.request.urlopen("https://www.python.org/")
You can also import specific tools from inside a toolkit by working in the from command with something like this:
>>> from urllib import request
>>> request.urlopen("https://www.python.org/")
In practice, you’ll use both of these methods.
Note
There’s no rule but most Python programmers try to keep things manageable by lining up all import statements at the top of each script.
Act 3: Web scraping
Now that we’ve covered all the fundamentals, it’s time to get to work and write a web scraper.
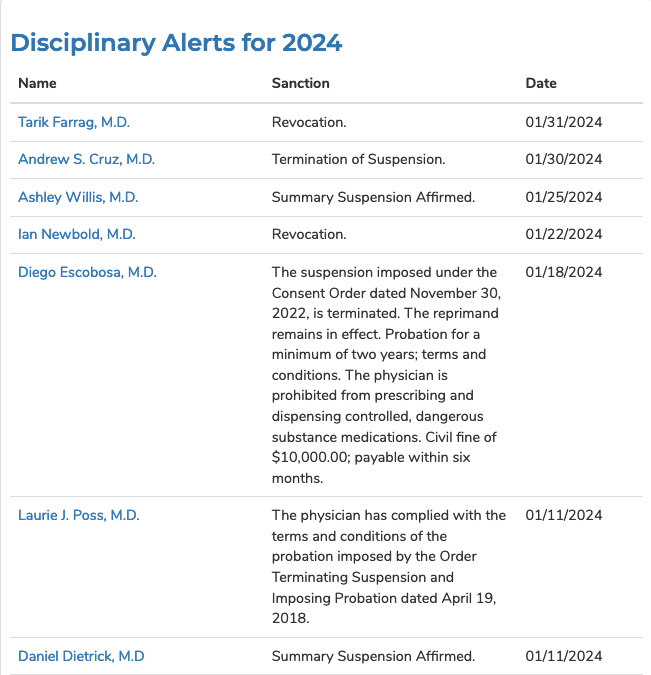
The target is a regularly updated list of sanctioned physicians from Maryland’s Board of Physicians. These include doctors who currently have active sanctions, suspensions, or other restrictions on their medical licenses.
Installing dependencies
The scraper will use Python’s BeautifulSoup toolkit to parse the site’s HTML and extract the data.
We’ll also use the Requests library to open the URL, download the HTML and pass it to BeautifulSoup.
Since they are not included in Python’s standard library, we’ll first need to install them using pip, a command-line tool that can grab open-source libraries off the web. It comes installed in our codespace, so we can just use it after exiting the Python interpreter by hitting Control-D:
$ pip install requests
$ pip install bs4
Analyzing the HTML
HTML is the framework that, in most cases, contains the content of a page. Other bits and pieces like CSS and JavaScript can style, reshape and add layers of interaction to a page.
But unless you’ve got something fancy on your hands, the data you’re seeking to scrape is usually somewhere within the HTML of the page and your job is to write a script in just the write way to walk through it and pull out the data. In this case, we’ll be looking to extract data from the big table that makes up the heart of the page.
By the time we’re finished, we want to have extracted that data, now encrusted in layers of HTML, into a clean spreadsheet.
In order to scrape a website, we need to understand how a typical webpage is put together.
To view the HTML code that makes up this page, open up a browser and visit our target. Then right click with your mouse and select “View Source.” You can do this for any page on the web.

We could fish through all the code to find our data, but to dig this more easily, we can use your web browser’s inspector tool. Right click on the table of data that you are interested in and select ‘inspect element.’
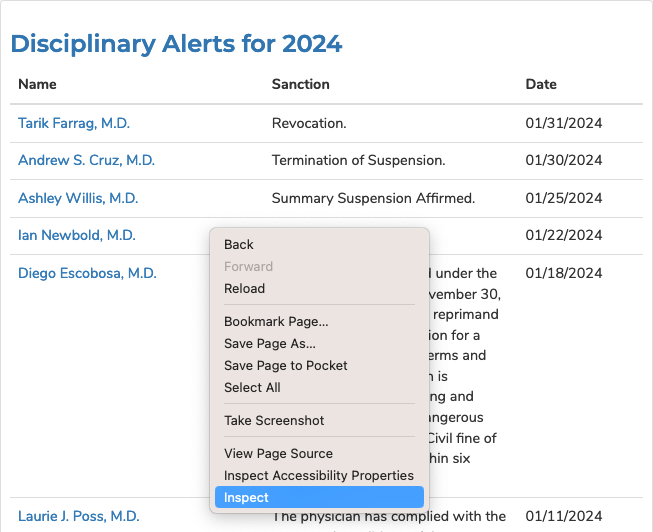
Note
The inspector tool might have a slightly different name depending on which browser you’re using. To make this easy on yourself, consider using Google Chrome.
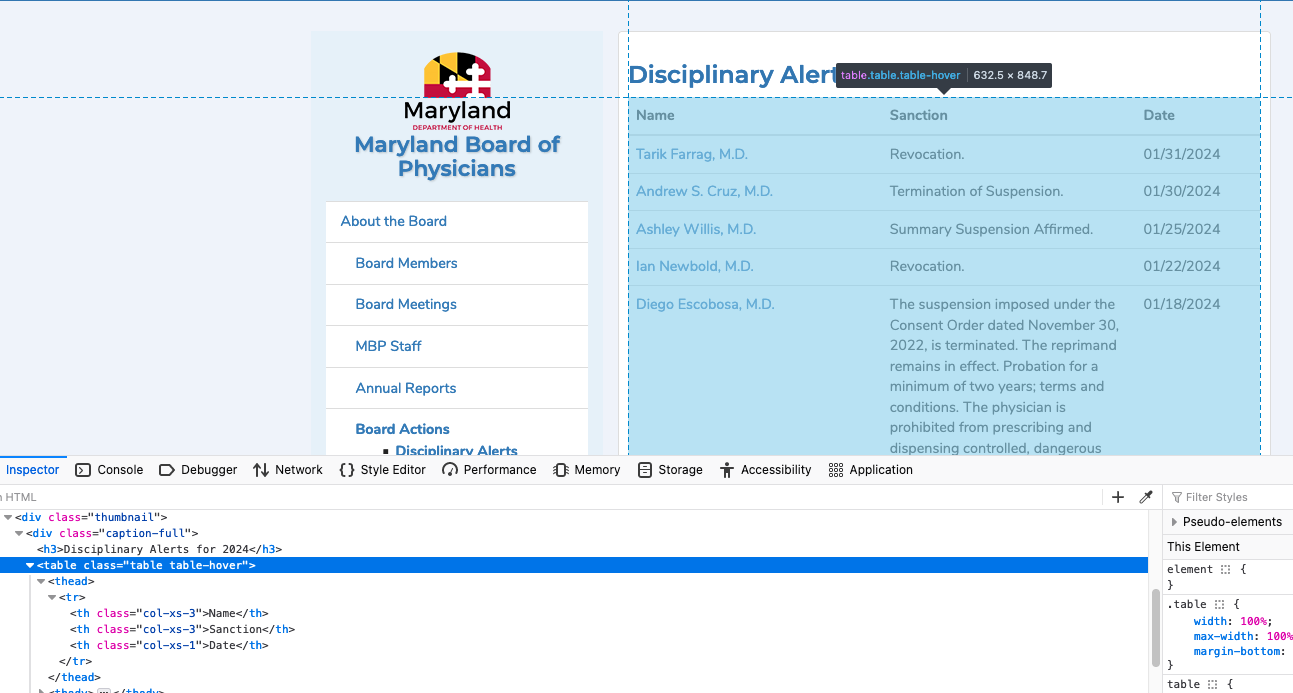
Your browser will open a special panel and highlight the portion of the page’s HTML code that you’ve just clicked on.
There are many ways to grab content from HTML, and every page you scrape data from will require a slightly different trick.
At this stage, your job is to find a pattern or identifier in the code for the elements you’d like to extract, which we will then give as instructions to our Python code.
In the best cases, you can extract content by using the id or class already assigned to the element you’d like to extract. An ‘id’ is intended to act as the unique identifer a specific item on a page. A ‘class’ is used to label a
specific type of item on a page. So, there maybe may instances of a class on a page.
On the Board of Physicians page, there is only one table in the HTML’s body tag. The table is identified by multiple classes.
<table class="table table-hover align-middle">
Extracting an HTML table
Now that we know where to find the data we’re after, it’s time to write script to pull it down and save it to a comma-delimited file.
Let’s start by creating a Python file to hold our scraper. First jump into the scrapers directory we made at the beginning of this lesson and then create another directory called legislature:
$ cd scrapers
$ mkdir physicians
$ cd physicians
Note
You’ll need to mkdir scrapers if you haven’t made this directory yet.
Then, on the left side of your codespace, right-click on the scrapers/physicians directory and choose “New File” and name it scrape.py.
The first step is to import the requests library and download the state webpage.
import requests

url = 'https://www.mbp.state.md.us/sanctions.aspx'
response = requests.get(url, headers={'User-Agent': 'Mozilla/5.0 (Macintosh; Intel Mac OS X 10.15; rv:121.0) Gecko/20100101 Firefox/121.0'})
html = response.content
print(html)
Save the file and run this script from your command line and you should see the entire HTML of the page spilled out.
$ python scrape.py
Next import the BeautifulSoup HTML parsing library and feed it the page.
import requests
from bs4 import BeautifulSoup

url = 'https://www.mbp.state.md.us/sanctions.aspx'
response = requests.get(url, headers={'User-Agent': 'Mozilla/5.0 (Macintosh; Intel Mac OS X 10.15; rv:121.0) Gecko/20100101 Firefox/121.0'})
html = response.content

soup = BeautifulSoup(html, features="html.parser")
print(soup.prettify())
Save the file and run the script again and you should see the page’s HTML again, but in a prettier format this time. That’s a hint at the magic happening inside BeautifulSoup once it gets its hands on the page.
$ python scrape.py
Next we take all the detective work we did with the page’s HTML above and convert it into a simple, direct command that will instruct BeautifulSoup on how to extract only the table we’re after.
import requests
from bs4 import BeautifulSoup

url = 'https://www.mbp.state.md.us/sanctions.aspx'
response = requests.get(url, headers={'User-Agent': 'Mozilla/5.0'})
html = response.content

soup = BeautifulSoup(html, features="html.parser")
table = soup.find('tbody')
print(table.prettify())
Save the file and run scrape.py again. This time it only prints out the table we’re after, which was selected by instructing BeautifulSoup to return the <tbody> tag, which is the body of the table.
$ python scrape.py
Now that we have our hands on the table, we need to convert the rows in the table into a list, which we can then loop through and grab all the data out of.
BeautifulSoup gets us going by allowing us to dig down into our table and return a list of rows, which are created in HTML using <tr> tags inside the table.
import requests
from bs4 import BeautifulSoup

url = 'https://www.mbp.state.md.us/sanctions.aspx'
response = requests.get(url, headers={'User-Agent': 'Mozilla/5.0'})
html = response.content

soup = BeautifulSoup(html, features="html.parser")
table = soup.find('tbody')

for row in table.find_all('tr'):
    print(row.prettify())
Save and run the script. You’ll not see each row printed out separately as the script loops through the table.
$ python scrape.py
Next we can loop through each of the cells in each row by select them inside the loop. Cells are created in HTML by the <td> tag.
import requests
from bs4 import BeautifulSoup

url = 'https://www.mbp.state.md.us/sanctions.aspx'
response = requests.get(url, headers={'User-Agent': 'Mozilla/5.0'})
html = response.content

soup = BeautifulSoup(html, features="html.parser")
table = soup.find('tbody')

for row in table.find_all('tr'):
    for cell in row.find_all('td'):
        print(cell.text)
Again, save and run the script. (This might seem repetitive, but it is the constant rhythm of many Python programmers.)
$ python scrape.py
Now that we have found the data we want to extract, we need to structure it in a way that can be written out to a comma-delimited text file. That won’t be hard since CSVs aren’t any more than a grid of columns and rows, much like a table.
Let’s start by adding each cell in a row to a new Python list, and we’ll clean up the whitespace in each cell. We’ll use ' '.join(cell.text.split()) which splits the text on any whitespace and rejoins it with single spaces, removing extra spaces within the text as well as at the edges.
import requests
from bs4 import BeautifulSoup

url = 'https://www.mbp.state.md.us/sanctions.aspx'
response = requests.get(url, headers={'User-Agent': 'Mozilla/5.0'})
html = response.content

soup = BeautifulSoup(html, features="html.parser")
table = soup.find('tbody')

for row in table.find_all('tr'):
    list_of_cells = []
    for cell in row.find_all('td'):
        text = ' '.join(cell.text.split())
        list_of_cells.append(text)
    print(list_of_cells)
Save and rerun the script. Now you should see Python lists streaming by one row at a time.
$ python scrape.py
Those lists can now be lumped together into one big list of lists, which, when you think about it, isn’t all that different from how a spreadsheet is structured.
import requests
from bs4 import BeautifulSoup

url = 'https://www.mbp.state.md.us/sanctions.aspx'
response = requests.get(url, headers={'User-Agent': 'Mozilla/5.0'})
html = response.content

soup = BeautifulSoup(html, features="html.parser")
table = soup.find('tbody')

list_of_rows = []
for row in table.find_all('tr'):
    list_of_cells = []
    for cell in row.find_all('td'):
        text = ' '.join(cell.text.split())
        list_of_cells.append(text)
    list_of_rows.append(list_of_cells)

print(list_of_rows)
Save and rerun the script. You should see a big bunch of data dumped out into the terminal. Look closely and you’ll see the list of lists.
$ python scrape.py
We’ve got much of the information we want, but there’s an important thing missing - the links to the various reports! Using cell.text just gives us the text inside an HTML tag, not any HTML it contains, including URLs. We can get those by checking to see if there is a link and, if so, grabbing the href tag instead of the text.
import requests
from bs4 import BeautifulSoup

url = 'https://www.mbp.state.md.us/sanctions.aspx'
response = requests.get(url, headers={'User-Agent': 'Mozilla/5.0'})
html = response.content

soup = BeautifulSoup(html, features="html.parser")
table = soup.find('tbody')

list_of_rows = []
for row in table.find_all('tr'):
    list_of_cells = []
    for cell in row.find_all('td'):
        if cell.find('a'):
            list_of_cells.append(cell.find('a')['href'])
        else:
            text = ' '.join(cell.text.split())
            list_of_cells.append(text)
    list_of_rows.append(list_of_cells)

print(list_of_rows)
Save and rerun the script.
To write that list out to a comma-delimited file, we need to import Python’s built-in csv module at the top of the file. Then, at the botton, we will create a new file, hand it off to the csv module, and then lead on a handy tool it has called writerows to dump out our list of lists.
import csv
import requests
from bs4 import BeautifulSoup

url = 'https://www.mbp.state.md.us/sanctions.aspx'
response = requests.get(url, headers={'User-Agent': 'Mozilla/5.0'})
html = response.content

soup = BeautifulSoup(html, features="html.parser")
table = soup.find('tbody')

list_of_rows = []
for row in table.find_all('tr'):
    list_of_cells = []
    for cell in row.find_all('td'):
        if cell.find('a'):
            list_of_cells.append(cell.find('a')['href'])
        else:
            text = ' '.join(cell.text.split())
            list_of_cells.append(text)
    list_of_rows.append(list_of_cells)

outfile = open("alerts.csv", "w")
writer = csv.writer(outfile)
writer.writerows(list_of_rows)
Save and run the script. Nothing should happen – at least to appear to happen.
$ python scrape.py
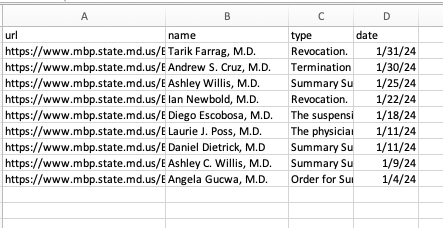
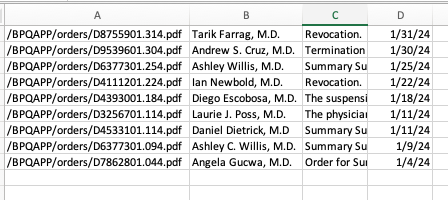
Since there are no longer any print statements in the file, the script is no longer dumping data out to your terminal. However, if you open up your code directory you should now see a new file named reports.csv waiting for you. Open it in a text editor or Excel and you should see structured data all scraped out.
There are a couple of problems, though. First, there are no headers!
Here’s why. If you go back and look closely, our script is only looping through lists of <td> tags found within each row. Fun fact: Header tags in HTML tables are often wrapped in the slightly different <th> tag. Look back at the source of the state page and you’ll see that’s what exactly they do.
But rather than bend over backwords to dig them out of the page, let’s try something a little different. Let’s just skip the first row when we loop though, and then write the headers out ourselves at the end.
import csv
import requests
from bs4 import BeautifulSoup

url = 'https://www.mbp.state.md.us/sanctions.aspx'
response = requests.get(url, headers={'User-Agent': 'Mozilla/5.0'})
html = response.content

soup = BeautifulSoup(html, features="html.parser")
table = soup.find('tbody')

list_of_rows = []
for row in table.find_all('tr'):
    list_of_cells = []
    for cell in row.find_all('td'):
        if cell.find('a'):
            list_of_cells.append(cell.find('a')['href'])
        else:
            text = ' '.join(cell.text.split())
            list_of_cells.append(text)
    list_of_rows.append(list_of_cells)

outfile = open("alerts.csv", "w")
writer = csv.writer(outfile)
writer.writerow(["url", "name", "type", "date"])
writer.writerows(list_of_rows)
Save and run the script once more.
$ python scrape.py
Our headers are now there, but there’s still a problem here: the URLs are relative, not full ones. We can’t just copy them into a browser or click on them. Let’s fix that:
import csv
import requests
from bs4 import BeautifulSoup

url = 'https://www.mbp.state.md.us/sanctions.aspx'
response = requests.get(url, headers={'User-Agent': 'Mozilla/5.0'})
html = response.content

soup = BeautifulSoup(html, features="html.parser")
table = soup.find('tbody')

list_of_rows = []
for row in table.find_all('tr'):
    list_of_cells = []
    for cell in row.find_all('td'):
        if cell.find('a'):
            list_of_cells.append("https://www.mbp.state.md.us" + cell.find('a')['href'])
        else:
            text = ' '.join(cell.text.split())
            list_of_cells.append(text)
    list_of_rows.append(list_of_cells)

outfile = open("alerts.csv", "w")
writer = csv.writer(outfile)
writer.writerow(["url", "name", "type", "date"])
writer.writerows(list_of_rows)
Save and run the script once more.
$ python scrape.py
And you’ve finished the class. Congratulations! You’re now a web scraper.
Bonus: Year Selector
You may have noticed that the sanctions page has a dropdown menu that allows you to select different years. By default, it shows the current year (2026), but you can view sanctions from previous years going back to 2010.
Let’s enhance our scraper to accept a year as a command-line argument and include it in our output.
Getting command-line arguments
Python has a built-in module called sys that gives us access to command-line arguments. When you run a script like python scrape.py 2025, the year “2025” becomes an argument we can capture.
Let’s modify our script to accept an optional year argument, defaulting to the current year if none is provided.
import csv
import sys
from datetime import datetime
import requests
from bs4 import BeautifulSoup

# Get year from command line or use current year
if len(sys.argv) > 1:
    year = sys.argv[1]
else:
    year = str(datetime.now().year)

url = 'https://www.mbp.state.md.us/sanctions.aspx'
response = requests.get(url, headers={'User-Agent': 'Mozilla/5.0'})
html = response.content
The sys.argv list contains all command-line arguments. The first item (sys.argv[0]) is always the script name, so sys.argv[1] is the first actual argument. We check if it exists using len(sys.argv) > 1.
Making a POST request with form data
The year dropdown works by submitting a form to the server. When you select a different year and the page reloads, it’s sending a POST request with form data. We need to simulate that.
Looking at the page source, we can see the form uses ASP.NET ViewState (those hidden fields with long encoded values). Fortunately, we can make this work by sending a POST request with the year parameter:
import csv
import sys
from datetime import datetime
import requests
from bs4 import BeautifulSoup

# Get year from command line or use current year
if len(sys.argv) > 1:
    year = sys.argv[1]
else:
    year = str(datetime.now().year)

url = 'https://www.mbp.state.md.us/sanctions.aspx'

# Make POST request with year parameter
response = requests.post(url,
                        data={'ddlYear': year},
                        headers={'User-Agent': 'Mozilla/5.0'})
html = response.content
We’ve changed from requests.get() to requests.post() and added a data parameter with the form field name ddlYear set to our chosen year.
Adding the year to our output
Now let’s include the year as a column in our CSV output so we know which year each record is from:
import csv
import sys
from datetime import datetime
import requests
from bs4 import BeautifulSoup

# Get year from command line or use current year
if len(sys.argv) > 1:
    year = sys.argv[1]
else:
    year = str(datetime.now().year)

url = 'https://www.mbp.state.md.us/sanctions.aspx'

# Make POST request with year parameter
response = requests.post(url,
                        data={'ddlYear': year},
                        headers={'User-Agent': 'Mozilla/5.0'})
html = response.content

soup = BeautifulSoup(html, features="html.parser")
table = soup.find('tbody')

list_of_rows = []
for row in table.find_all('tr'):
    list_of_cells = []
    list_of_cells.append(year)  # Add year as first column
    for cell in row.find_all('td'):
        if cell.find('a'):
            href = cell.find('a')['href']
            # Only prepend domain if URL is relative
            if href.startswith('http'):
                list_of_cells.append(href)
            else:
                list_of_cells.append("https://www.mbp.state.md.us" + href)
        else:
            text = ' '.join(cell.text.split())
            list_of_cells.append(text)
    list_of_rows.append(list_of_cells)

outfile = open("alerts.csv", "w")
writer = csv.writer(outfile)
writer.writerow(["year", "url", "name", "type", "date"])
writer.writerows(list_of_rows)
Notice we add the year to each row before processing the table cells, and we’ve updated our header row to include “year” as the first column.
We also check if the URL already starts with “http” before prepending the domain - when using POST requests, the server sometimes returns absolute URLs instead of relative ones.
Testing the year selector
Now you can run the scraper with different years:
# Get data for the current year (default)
$ python scrape.py

# Get data for 2025
$ python scrape.py 2025

# Get data for 2020
$ python scrape.py 2020
Each time you run it with a different year, the CSV will contain sanctions from that specific year with the year included in each row.
Taking it further
If you wanted to get really fancy, you could write a loop to scrape all available years (2010-2026) and combine them into a single CSV file. Here’s a hint on how you might approach that:
import csv
import requests
from bs4 import BeautifulSoup

url = 'https://www.mbp.state.md.us/sanctions.aspx'
all_rows = []

# Loop through years from 2010 to 2026
for year in range(2010, 2027):
    print(f"Scraping {year}...")
    response = requests.post(url,
                            data={'ddlYear': str(year)},
                            headers={'User-Agent': 'Mozilla/5.0'})
    html = response.content

    soup = BeautifulSoup(html, features="html.parser")
    table = soup.find('tbody')

    for row in table.find_all('tr'):
        list_of_cells = [str(year)]
        for cell in row.find_all('td'):
            if cell.find('a'):
                href = cell.find('a')['href']
                if href.startswith('http'):
                    list_of_cells.append(href)
                else:
                    list_of_cells.append("https://www.mbp.state.md.us" + href)
            else:
                text = ' '.join(cell.text.split())
                list_of_cells.append(text)
        all_rows.append(list_of_cells)

outfile = open("all_sanctions.csv", "w")
writer = csv.writer(outfile)
writer.writerow(["year", "url", "name", "type", "date"])
writer.writerows(all_rows)
print(f"Scraped {len(all_rows)} total records!")
This will take a bit longer to run since it’s making 17 separate requests, but you’ll end up with a comprehensive dataset of all sanctions from 2010 to 2026!
Note
The repository includes two bonus scripts you can reference:
scrape_year.py- Accepts a year argument and adds the year columnscrape_all_years.py- Scrapes all years from 2010 to present
These skills will serve you well as you continue to build more sophisticated scrapers and data collection tools. Happy scraping!